
TOOLS NEEDED:
Pencil, screwdriver and drill
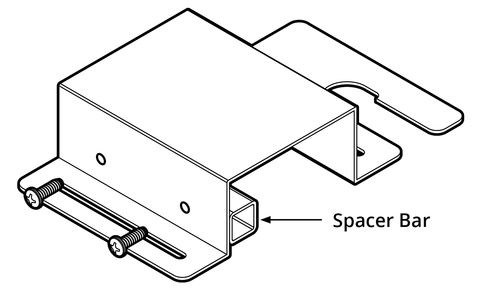
HOW THICK IS YOUR DOOR?
For doors up to 1-3/8" thick:
Leave the spacer bar attached.
For doors up to 1-13/16" thick:
You may need to remove the spacer bar to fit the GlideLok on top of your door. Use a #2 Phillips drill bit, and be careful to avoid stripping out the screws.
STEP-BY-STEP INSTALLATION
STEP 1:
First, watch the video at the top of this page. Customers who view this video have far fewer problems installing their GlideLok.
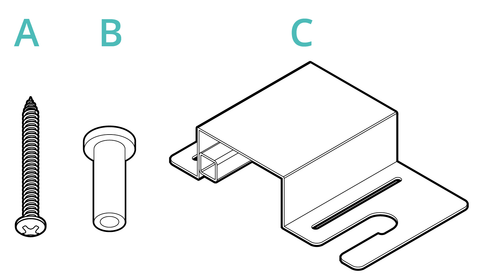
Next, ensure that you received all 3 parts shown above. If you did not receive all parts, submit a ticket.
STEP 2:
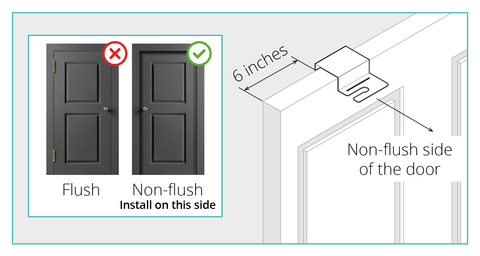
Place GlideLok Part C on top of your door with the U-shaped slot about 6" from the door edge over your door knob. The GlideLok screw (Part A) and peg (Part B) should be installed on the non-flush side of the door frame. (See picture above. The non-flush side does not show the hinges.) Remember, the GlideLok can still operate from BOTH sides of the door, regardless of which side the peg is on.
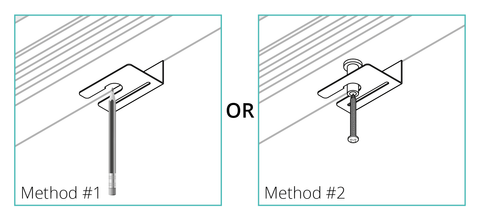
STEP 3:
With the door closed, “test glide” the GlideLok to ensure it slides smoothly. If it does not, adjustments to the door may need to be made. (See troubleshooting tips starting at 2:16 of this video.) Mark where you want to drill on the door frame, using a pencil lined up at the center of the U-shaped slot. Or, for even better accuracy, slide the peg just above the narrow opening of the GlideLok U-shaped piece. Use the screw to mark the exact spot you want to drill.
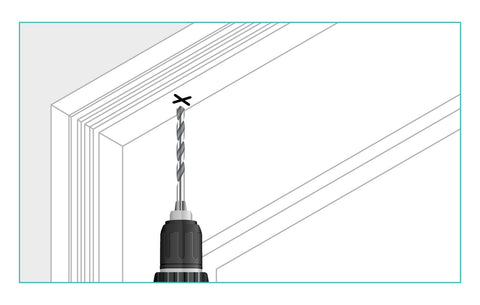
STEP 4:
To prevent wood damage, drill a 1/8” pilot hole into the spot you marked on the door frame..
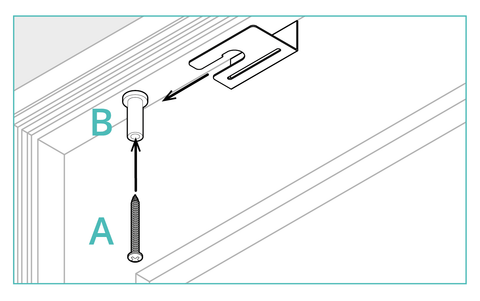
STEP 5:
Place the screw (Part A) into the peg (Part B). Use a #2 Phillips drill bit to screw the peg into the 1/8” hole from Step #4. Close the door, and the GlideLok U-shaped slot will slide onto the peg to secure the door.
HAVING TROUBLE WITH INSTALLATION?
View our full list of FAQs and troubleshooting tips.
If you still have issues after reading these tips, please submit a ticket and describe your specific issue. Photos are always welcome. Most issues can be solved if you contact us.
We are the inventors of the GlideLok and are very responsive to emails. We would love to help you!
WARNING: CHOKING HAZARD
This product contains small parts. The product components, packaging, and instructions are not toys for any age child.
IMPORTANT:
The GlideLok must be properly installed to function correctly. This product does not replace supervision of your children or loved ones. If you use the GlideLok, as with any other childproof door lock, you are responsible for getting your loved one to safety in an emergency since they may be unable to open the door. By purchasing this product, you indicate your agreement to hold harmless the manufacturer, brand owner and retailer/seller of the GlideLok for any consequences of its use or misuse. If you do not agree to these terms, please do not use the GlideLok.